Disclosure: I mention some products that I’m an affiliate for is this post. If you buy via my link, then I get a commission — thank you!
When is the last time you cleaned your laptop?
Are you too busy with your life or just don’t have any idea know how to clean your laptop by yourself? Well, you’re not alone.
In fact, many people don’t maintain their laptop, and very often their laptops are very dirty and dusty.
A laptop is an expensive and very sensitive device that needs extra care. Dust is accumulating overtime at air vents that could cause the laptop overheating. Your fingerprints, dirt, hairs, and crumbs from the food you ate, are sticking all over the places, especially the keyboard area on your laptop. Germs are more likely to live in there.
If you love and want to keep your laptop in good condition for many years to come, there are no excuses for you not to clean your laptop.
I want to share with you this guide on how to clean your laptop correctly. I am not an expert, but this is from my personal experience and some research that I did.
What Do You Need to Clean a Laptop?
Cleaning a laptop requires you to use several tools and materials of which you can buy them from the stores near you or online stores like Amazon.com.
Here are what you need to use to clean your laptop:
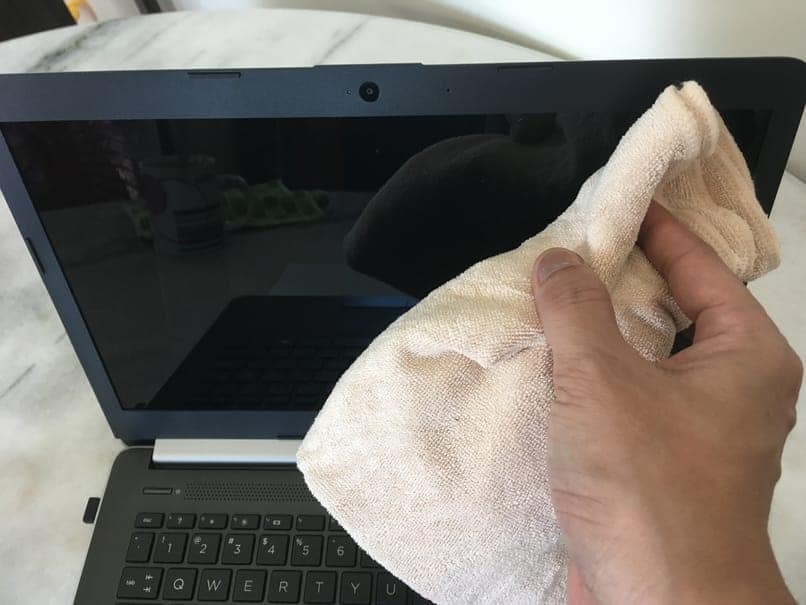
Microfiber Cleaning Cloths
It is the best cloth use to clean your laptop screen because it doesn’t produce lint or scratches on the surface.
If you don’t know what the microfiber cloth is – it is a type of material that made of extra-fine synthetic fiber.
Microfiber cloth is commonly used for cleaning the laptop and also lens (glasses).
Our Recommendation:
No products found.
Compressed Air Cans or Computer Cleaner Blower
You need any one of these blasting the dust on your laptop. The latter is a bit pricey but of course more powerful. If your budget is tight, compressed air cans work just fine.
Our Recommendation:
No products found.
Damp Sponge
This is optional though usually used to rub off the heavy dirt.
Our Recommendation:
No products found.
Cotton Swabs
Need a lot of this.
Our Recommendation:
No products found.
Distilled Water
A bottle or a gallon of distilled water should be enough.
Our Recommendation:
No products found.
Isopropyl Alcohol
One or two bottles should be sufficient. Get the one that is made to clean the glasses and screen.
Our Recommendation:
No products found.
A Small Paintbrush with Soft Bristles
We use it to remove the dust.
Our Recommendation:
No products found.
Flathead Screwdriver
Get a small size of flathead for prying purpose.
Our Recommendation:
No products found.
Never Use These…
DON’T use these things to clean your laptop:
- Household vacuum cleaner – It is not so effective at removing the dust and can potentially cause a build-up of static electrical charges around your laptop.
- Tap Water – It contains fluorides that potentially leave a residue.
- Alkaline or acidic detergent – It can damage the electronic components.
- Washcloth, paper towels, T-shirt or household rags –They scratch your laptop screen and potentially leaving extra debris on it.
Before You Start Cleaning a Laptop
Before you start cleaning your laptop, there are some essential things you should do first:
- Shut down your laptop and unplug it from the power source. Another benefit is shutting down your laptop is that by having a blank screen, you will able to see any fingerprints and dust that you need to wipe down. If the power is on, it will be difficult for you to see the dirt.
- Remove the laptop battery as well to be on the safe side. You don’t want to get shocked by any electrostatic charges that could potentially damage the internal components of the laptop.
- Remove all the cables and connected devices such as memory cards, a wireless keyboard and mouse receiver, pen drive, the charger, and internet LAN cable if any.
Once you have done these, now you can start doing your laptop cleaning work.
Cleaning the External Laptop

Firstly, close the lid of your laptop and starts the cleaning process from the bottom.
Take a clean microfiber cloth and gently wipe the entire bottom area without applying too much pressure. Usually, this can clean out any dust at the bottom surface.
If your laptop is very dirty, you can dampen the cloth with distilled water. Please don’t dampen it too much as any excess water can slipping into the internal parts of your laptop.
Rub the cloth by applying a bit of pressure to the stained surface area.
As an alternative to the distilled water, you also can use the isopropyl alcohol designated for cleaning the electronic to clean your external laptop.
Just spray a little amount of alcohol on your microfiber cloth and then rub the laptop bottom area.
The good thing about using the alcohol for this cleaning is that it can evaporate very fast and will not leave any trace of residue on the surface.
I would not encourage you to directly spray the alcohol as you may accidentally spray too much of alcohol that will cause it enters into the air vents where the sensitive components are located.
Although alcohol can evaporate very quickly but to be on the safe side, don’t do it. Once you’ve done cleaning the bottom of the laptop, flip it over, and repeat the same procedure of cleaning to the front surface of the laptop.
This time if you want to apply the alcohol directly to the front surface of your laptop, it should be fine because there are no air vents.
Make sure to use a dry microfiber cloth to finish drying the laptop surface.
How to Clean Your Laptop Screen
Mainly there are three different levels, or should I say there are three different ways of cleaning your laptop screen.
Whichever the method you choose, much depends on what type of dirt you intend to clean. So here are the three levels of cleaning that you could follow in cleaning your laptop screen.
Level 1: To Get Rid of Dust and Particles
There are two methods to achieve this.
First off, if you have the compressed air duster or can, use it to blast the dust off of the laptop screen follow by wiping down with a microfiber cleaning cloth.
However, if you don’t have the compressed air duster, you can wipe the screen with a microfiber cloth directly.
As you clean your laptop screen, press the microfiber cleaning cloth gently and work your way from side to side or from top to bottom.
This will effectively push all dust to one side and wiping off all the dust particles.
If possible, please try not to wipe it in circular motion too long and hard on a single spot because it could damage the screen.
Also, don’t scrub the screen to avoid the screen pixel from burnout. Continue wiping down until all dust is gone.
Level 2: To Get Rid of Dirt, Fingerprints, Saliva, Grime
The first step above should be enough to clean off the common particles like dust, but sometimes you may encounter the stubborn dirt, fingerprints, oily, and sticky stuff on your laptop screen. To get rid of them, you need to take it further action.
Firstly, get another clean microfiber cloth and damp it with distilled water or deionized water that is used for cleaning purpose.
These type of waters are processed to remove mineral ions that could cause accidental damage to your laptop.
Do not use the tap water because it contains chemicals like fluorides and also tends to leave the residues on the screen.
When you damp the microfiber cloth with distilled water, make sure when you wring it until you see there is no water start dripping. It supposes to thoroughly damped.
You don’t want the water to run down the screen and slip into the internal screen and laptop body.
What you should do now is to gently rub in a circular motion to the fingerprint or oily spot. Again, don’t press too hard as you could distort any of the pixels of your laptop screen.
Repeat the process at another spot on your screen until they are completely wiped off. If you don’t want to use the microfiber cleaning cloth for this job, another alternative is to use the damp sponge.
Make sure it is clean and if possible, get a new one. Apply the same method as you do for a microfiber cloth.
Level 3: Cleaning With Screen Cleaner
In the worst scenario where you’ve tried both methods but didn’t work, the last choice is by using a cleaning solution. You need to spend a little bit of money to get those solutions out there.
Make sure that any cleaning solution that you buy does not contain any ammonia or alcohol because these two chemicals may seem right at first, but they can ruin the screen of your laptop after using it for a longer period.
Most of them in the market will include a microfiber cloth inside their packaging. So you don’t have to worry if you don’t have one. Now you have got it. Let’s proceed with level 3 cleaning method.
Take your screen cleaner and spray it onto the microfiber cloth. Don’t spray the screen cleaner directly onto your laptop screen itself.
Start your work by wiping the fingerprints or any dirt with the microfiber cloth. Apply it from side to side and from top to bottom.
Perform a small circular motion gently without applying any pressure to the affected area until your laptop screen is cleaned.
Then let itself dry. This cleaning process should be able to wipe off all the stubborn specks of dirt and fingerprints.
How to Clean Your Touch Screen Laptop
If you own a touch screen laptop like Microsoft Surface Laptop 2 or HP Envy Series, you have to clean your laptop frequently because you touch it with your fingers almost all the time.
Your fingers can leave a lot of fingerprints or oily spots on the screen. The good news is that most of the touch screen laptop has some coated or additional protective screen to make it easier for you to clean.
Before you start cleaning the touch screen laptop, always ensure the laptop is powered off to prevent any accidental damage while working on it.
Take your clean microfiber cloth and repeat the same methods as mentioned in level 1 above.
If you’re unable to wipe off oily fingerprints on your touch screen, repeat the step shown in level 2 & level 3 above.
Please be careful, though that, unlike the non-touch screen, your touch screen laptop is susceptible to the pressure. You need to take extra care not to rub it hard while cleaning it.
How to Clean Your Laptop Keyboard
The laptop keyboard is dirtier than you think, and it requires frequent cleaning. Dust, crumbs, and hairs can slowly build up in the crevices on the keyboard.
Your fingerprints and oily stuff can create residues, and this will become an ideal place for germs to live.
There two ways that you can do to clean your keyboard. The first way is without removing the keyboard and another way to remove the keys and clean it.
I will explain how you can achieve this.
Cleaning the Keyboard Without Removing the Keys

Here is the easiest way to clean a keyboard without removing the keys. Start cleaning with the compressed air by using a short blast to remove heavy accumulated dust.
Try to focus the blast on the gap between the keys to remove out the trapped dust or particles.
Take the brush, go over the key again, and gently strokes the brush to remove any other dust. You also can purge the keyboard with the compressed air while running your brush along the sides of the keys.
If you notice that any key has extra dirty, use a cotton swab. If necessary, lightly moisten the cotton swab with distilled water then repeat the cleaning.
When you finished, wipe the keyboard with a dry microfiber cloth. If the oily residue or stubborn dirt still appear on the keyboard, moisten the cotton swab with isopropyl alcohol and repeat the cleaning.
Don’t apply the alcohol to the laptop screen because it can damage the anti-glare coating on the screen!
Once all the dust and dirt are cleaned out, take some isopropyl alcohol and pour it directly onto the clean microfiber cloth.
Do not pour the alcohol directly onto your laptop keyboard. Wipe the laptop keyboard surface with the cloth until clean.
Cleaning the Keyboard By Removing the Keys
This method requires you to remove all the laptop keyboard keys. At first, it may sound difficult to you, but with some practices, anyone can learn how to do it at home.
Only do this when you think that you should clean out the dust underneath the keyboard. Frequently removing the keys can damaging your laptop keyboard.
When you have decided to proceed, it is a good idea to take a picture of your laptop keyboard with your smartphone so that you don’t need to remember the location of the keys when installing them later.
Pry off all the keys out with the flathead screwdriver. Be careful not to pry it hard else the keys will fly over the place. If the key is hard to remove out, don’t force it.
The best idea is just left it there and proceed with other keys. You can always have access to clean it once the nearby keys are removed.
After all the keys have been removed out, damp the microfiber cloth with alcohol and gently wipe the exposed area of the keyboard.
Don’t put too much alcohol on the cloth for cleaning. Any excess of alcohol can slip into the internal components of the laptop.
Dip the cotton swab with the alcohol and clean all keys then let them dry. Once done, place back all keys by snapping them into their designated location. Just refer to the picture you have taken with your smartphone earlier.
Make sure you test all the keys by pressing one by one to check for improper installation. The key should be smooth when pressing and if it doesn’t, reinstall it back.
Cleaning the Palm Rest and Touchpad Area
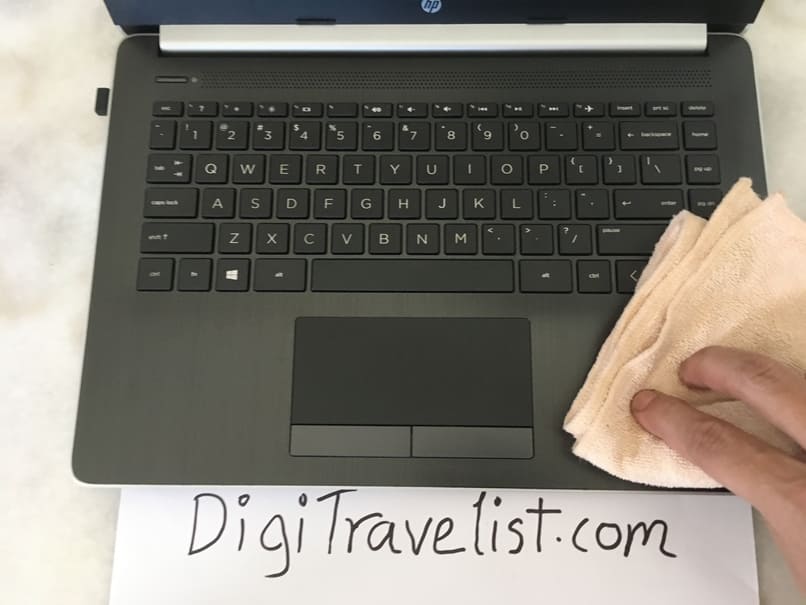
Without a doubt, the palm area is the dirtiest area of the laptop because you spend a lot of time resting your palm on it when typing something on the keyboard or touching the touchpad area.
A lot of sweat and oily stuff from your palm sticking there.
Spray the isopropyl alcohol lightly on the microfiber cloth, then wipe the palm rest and touchpad area by working your cloth back and forth.
Repeat this process a few times until these areas are cleaned.
You can use a brush to remove any dust on the touchpad area. Finish it with some compressed air.
Cleaning the USB Ports and Air Vents
After using your laptop for an extended period, there are chances that dirt and dust have accumulated around laptop USB ports and air vents. To clean these areas, you only need a brush and a few cotton swabs.
Let’s start with cleaning the USB ports. Take your brush and run the brush carefully across the USB ports but be sure not to brush inside the terminals.
Use the cotton swab to clean around the edges, again avoiding touching any of the internal contacts.
If the cotton swab gets dirty after you clean it, don’t use it again but get another new one and repeat the cleaning step.
Finish by blowing the USB ports area with the compressed air in a direction away from your laptop.
To clean the laptop air vents, you need to use a brush to remove any dirt that has accumulated on the outside edges of the vent. If necessary, use a cotton swab to remove any excess of the dust.
I don’t recommend you to use the compressed air for this step as it can blow dust or dirt back into the interior of the laptop.
Final Step
Once you’ve finished clean your laptop, let it dry for a while. Then, you can put back all the stuff that you have removed like the battery, cables, charger, etc.
Turn on your laptop and ensure your laptop is working as usual. If you encounter any abnormality and you not sure how to fix it, bring your laptop over to the experts.
So, generally cleaning a laptop is not a difficult task. Just be careful in everything you do, and you will be fine. Try to remind your self to clean your laptop periodically.
If you know that you’re not going to use your laptop for an extended period, be sure to keep it stored in a sealed laptop bag or the laptop sleeve.
Dust and dirt can quickly build up in a matter of days if your laptop is left out in the open.
Related posts: